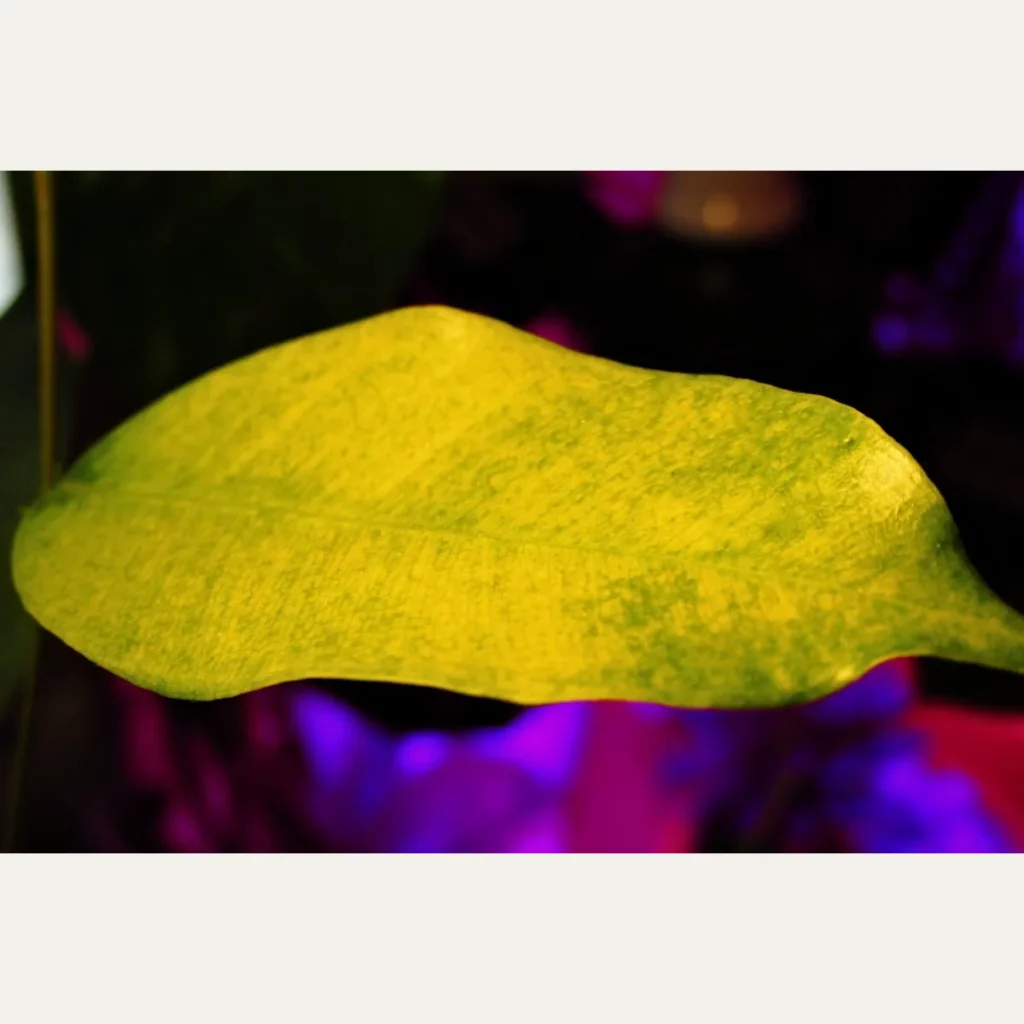
You spot a yellow leaf and consider watering, feeding or moving the pot. Before doing everything at once, pause and look closely. Yellow leaves are a symptom, not a diagnosis. The most useful approach is to consider the whole picture: which leaves have changed, how the potting mix feels and what has happened recently.
This guide helps you investigate yellowing in ornamental plants at home and in the garden. For a practical example of species-specific care, see our guide to growing basil. The needs of the species remain your starting point: a cactus and a nerve plant should not receive the same treatment.
Start with three questions
Where did it begin? One older leaf near the base tells a different story from several young leaves turning yellow. Note whether the change affects the whole plant or only the side facing a window.
When did it begin? Compare the symptoms with recent changes: a new location, repotting, feeding, prolonged rain or a different watering routine.
What else is happening? Look for wilting, spots, dry tips, visible insects and leaf drop. Photograph the whole plant and a close-up, preferably under similar lighting each time.
Reading the pattern of yellow leaves
One older leaf, while the rest of the plant looks healthy: this may be natural leaf replacement. Watch for other leaves turning yellow and check that growth remains normal. Leaf age is a clue, not a reason to ignore increasing leaf loss.
Many yellow leaves and a wilting plant: check moisture before watering. Damaged roots may be unable to supply the shoots with water even when the potting mix is wet. Wilting does not automatically mean thirst.
Yellow areas between veins that remain green: note whether this first appeared on young or old leaves. This pattern, called interveinal chlorosis, can help guide a nutrient investigation, but does not identify one nutrient on its own or rule out root problems. Localised spots: photograph their edges and watch for expansion instead of assuming every colour change means a lack of fertiliser.
1. Check water and drainage
Both too little and too much water can accompany yellowing. Colour alone cannot tell you whether the plant needs more water. Check the moisture of the potting mix, the weight of the pot and whether water is collecting inside a decorative outer pot.
If the mix stays waterlogged, check that drainage holes are clear and water can escape. If it is drier than the species can tolerate, adjust watering. Avoid turning this investigation into a fixed schedule: heat, rainfall, pot size and growing mix all affect drying speed.
The surface may look dry while the centre of the pot remains moist. Check a little below the surface without damaging roots, compare the weight with the same pot after watering and draining, and note how long it stays wet. No single drying depth applies to every species.
Repeated wilting, an unpleasant smell or a mix that never returns to suitable moisture may call for inspecting the root ball. Do not uproot a well-established plant because of one yellow leaf. During inspection, soft, deteriorating tissue matters more than colour alone: naturally dark roots are not proof of rot. Seek advice before making extensive cuts.
2. Look at light and changes in surroundings
Has the plant recently moved into direct sun or a dark corner? Unsuitable light and sudden changes can contribute to yellowing. Observe the location throughout the day, not only when you usually arrive home.
Record hours of sunshine, closed curtains and obstructions. This simple record helps you compare actual conditions with the species’ needs, without moving the pot every time another leaf changes colour.
Also consider air conditioning, hot wind and sudden temperature changes. Note what changed along with the location: a sunnier window may increase water use. Moving a plant while keeping its old watering routine can create two problems at once.
3. Look for pests before applying products
Inspect the undersides of leaves, the points where leaves join stems, and new shoots. Sap-feeding insects can also cause yellowing and loss of vigour. If you suspect an infestation, separate the pot from other plants while identifying the problem.
A close-up photograph helps explain the situation to a professional. Do not assume that every white speck is a scale insect or mealybug, and do not spray different products by trial and error.
4. Do not feed a plant just because a leaf is yellow
Nutrient deficiencies are one possibility, but root problems, water and light also need consideration. Adding fertiliser without assessing the circumstances may leave the cause unresolved. Check what has already been applied and follow the product instructions and the plant’s needs.
With nitrogen deficiency, yellowing often begins on older leaves; with iron deficiency, young leaves may turn yellow between green veins. Use these differences to form questions, not to choose a fertiliser from a photograph alone. The pH of the growing medium can make nutrients less available even when they are present. The Royal Horticultural Society explains deficiency patterns and the limits of visual diagnosis.
If a plant worsened after feeding, record the product, dose, dilution and date. Salt build-up can also damage roots. Do not try to compensate by adding another fertiliser, lime, vinegar or a homemade mixture. Persistent problems may require professional assessment of the growing medium and water rather than repeated blind adjustments.
What to do after the first inspection
Choose a correction supported by your observations and record the date. Monitor new leaves, the spread of yellowing and the plant’s overall condition. The aim is to restore suitable growing conditions, not to promise that every old leaf will become green again.
If deterioration is rapid, tissues become dark and soft, or the problem persists despite adjustments, seek qualified horticultural advice. Bring photographs, the plant’s name and its watering and feeding history. These details are more useful than simply saying that it is yellow.
Will a yellow leaf turn green again? Should I cut it off?
That depends on the cause and the extent of tissue damage. Ageing leaves or leaves with dead areas should not be your only measure of recovery. Focus on whether yellowing stops spreading and new growth looks healthy. There is no universal recovery time: slow-growing species may take longer to produce shoots.
Do not remove several partly green leaves simply to improve appearances. Completely dry leaves can be removed carefully, using a clean tool where needed. Cutting off a leaf does not fix the cause of the yellowing. Take a photograph before discarding it to preserve a record.
Keep a simple record to judge progress
Choose two or three reference leaves and photograph the whole plant. Note the condition of the growing medium and the correction you made. At later checks, compare the same parts: have new yellow areas appeared? Have more leaves fallen? Has the plant regained firmness? Avoid relying on memory alone or changing water, light, pot and fertiliser all at once.
For example, a pot standing in water inside an outer container, with waterlogged growing mix, calls first for removing the standing water and checking drainage. A plant recently moved into strong sun, with damage on the exposed side and suitable soil moisture, calls for reviewing light exposure. These are working hypotheses, not guaranteed diagnoses for every species.
A checklist to take into the garden
Plant name; whether young or old leaves are affected; moisture of the growing medium; pot drainage; light received; visible insects; recent changes; products applied. Completing this checklist before acting helps prevent rushed decisions.
For more on why the same colour can have different causes, see yellowing leaves on indoor plants, University of Maryland; chlorosis, RHS; watering indoor plants, Clemson University; and watering and salt build-up, University of Maryland.
Sources and further reading
University of California Integrated Pest Management: houseplant problems and Iowa State University: diagnosing houseplant problems. General recommendations must be adapted to the species and its surroundings.
Opening photograph: a Ficus benjamina leaf with chlorosis. Photo: Trio3D / Wikimedia Commons, CC BY-SA 4.0. Framed as a square with neutral margins, resized and converted to WebP; adaptation shared under the same licence. The photograph does not establish the cause of yellowing.
